How to configure a WordPress testing sandbox
This article describes how to set up a dedicated WordPress testing environment, also known as a sandbox. With a sandbox, you can safely test and experiment with a WordPress installation without affecting your live WordPress site.
Table of Contents
Why use a sandbox?
Suppose you want to try out a new WordPress theme or plugin. You probably do not want to do this on your live production site. (What if a new plugin renders your entire inaccessible? Or the new theme you install looks terrible?) On the other hand, you want to be able to do your testing in an environment that matches the live site as closely as possible.
A sandbox provides an isolated environment where you can do this testing and experimentation without fear of affecting your live site. In the following procedure, we use ManageWP to create an exact site copy (also known as a clone) that runs on the same server as the live WordPress site.
Setting up a sandbox
To set up a WordPress sandbox installation using ManageWP, follow these steps:
- Use cPanel to create a MySQL database and database user for the cloned WordPress site. You will need to provide this information during the cloning process.
For information about how to create a MySQL database and user, please see this article.
- Use cPanel to create an FTP user to use during the cloning process.
For information about how to set up an FTP user, please see this article.
- Log in to the WordPress site you want to clone, and then install the ManageWP - Worker plugin.
For step-by-step instructions about how to install the ManageWP plugin, please see this article.
- If you have not already done so, set up a ManageWP account at https://managewp.com.
- Log in to your ManageWP account, and then add the WordPress site that you want to clone. After you do this, you are ready to begin the cloning process.
- On the top menu bar of the ManageWP dashboard, click Backup/Migrate, and then click Clone/Migration Wizard:

In the Clone/Migration Wizard dialog box, on the Select Source page, select Existing Website on Your Account, and then click the name of the site you want to clone:
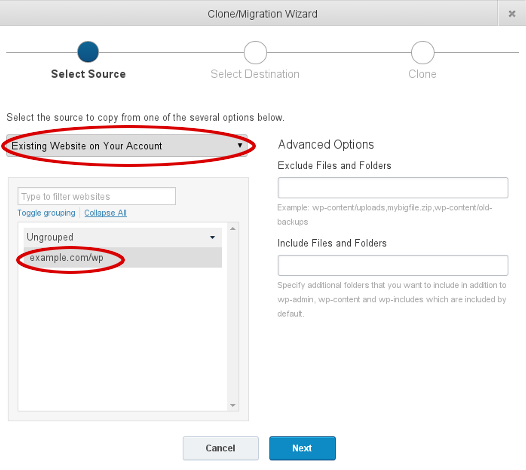
- Click . ManageWP creates a snapshot of the existing site, and then Select Destination page appears.
Select New Website. The New Website options appear:
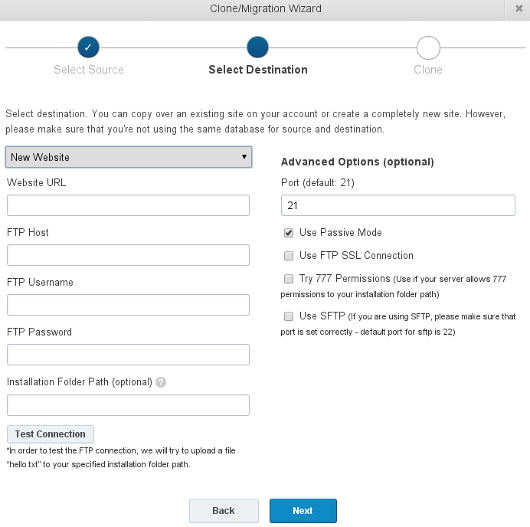
On the Select Destination page:
- In the Website URL text box, type the URL for the new site.
You can create the cloned site in a subdirectory (for example, example.com/clone) or in a subdomain (for example, clone.example.com). For information about how to set up a subdomain, please see this article.
- In the FTP Host text box, type your A2 Hosting account's server name.
For information about how to determine your account's server name, please see this article.
- In the FTP Username text box, type FTP account username that you created in step 2.
- In the FTP Password text box, type the FTP account password that you specified in step 2.
- In the Installation Folder Path text box, type the destination path where ManageWP will copy the site.
This path is based on the root directory for the FTP account. For example, if the FTP account's root directory is public_html, and the website URL is example.com/clone, then the installation folder path is clone.
- Under Advanced Options, confirm that the Port text box value is 21.
- Select the Use Passive Mode check box.
- Click . You should receive a Connection Successful message. If you do not, review the FTP settings and try again.
- In the Website URL text box, type the URL for the new site.
- Click
Specify the database settings:
- Confirm that the DB Host text box value is localhost.
- In the DB Name text box, type the name of the database that you created in step 1.
- In the DB Username text box, type the name of the database user that you created in step 1.
- In the DB Password text box, type the password for the database that you created in step 1.
Click . The Other Options page appears:
- You can optionally create a new administration account for the cloned WordPress site. To do this, specify the new username and password in the text boxes provided.
- To instruct search engines not to index the cloned site, select the Discourage search engines from indexing this site check box.
- To add the cloned site to your ManageWP account, select the Add website to ManageWP check box.
- Click , and then click . ManageWP clones the site.
- When the clone process is complete, click Visit your new site. The cloned site, an exact copy of the original site, appears in a new browser tab.
More Information
For more information about the concept of sandboxing, please visit https://en.wikipedia.org/wiki/Sandbox_(software_development).
Article Details
- Product: All accounts
- Level: Intermediate
Grow Your Web Business
Subscribe to receive weekly cutting edge tips, strategies, and news you need to grow your web business.
No charge. Unsubscribe anytime.
Did you find this article helpful? Then you'll love our support. Experience the A2 Hosting difference today and get a pre-secured, pre-optimized website. Check out our web hosting plans today.